About this blog

Follow on Bloglovin
Showing posts with label green. Show all posts

Wednesday, 6 February 2013

Nails: 'Lovey Dovey'

Quick Quick post...

Yet another unconventional nail design for V-day.

May I proudly present to you, 'Lovey Dovey'. A colorful combo to represent happiness, celebration and above all...LOVE!


I'm going to try and be short on this one.

First I covered my nails with two layers of 'Pimp My Shrimp' from Catrice...all ten nails. But you can decide to give your accent nail a different background color if you like.
On the accent nail, my ring finger in this case, I used an old ballpoint pen to draw a bigger circle and right above that, a smaller one...both in 'Birds Flying High'from Catrice and 'White'from Jordana.
Underneath the bigger circles I painted a horizontal stripe with a small brush and using 'Brown' from Jordana. The small leaf-like accents were brought on with the same brush using 'Acid DC' from Catrice.
Then, let it all dry thoroughly!


While waiting I added big dots with the ballpoint on all remaining nails using the 'Birds Flying High'and the 'White'. And then I filled in between the empty spaces with little dots of 'Brown' using a toothpick.

As the accent nail is completely dry I added the details to the birdies with a nail art pen (You can also use a regular sharpie if that's what you got). And in between the lovebird I added to small red hearts.
Ahhhhh...love's in the air!!


Try it for yourself. And wear some pretty unconventionally cute nails this coming V-day.

X's n' O's

Sy

Sunday, 23 December 2012

Nails: "Dear Rudolph"

Right before Christmas...another Christmas nail art.

This time it's 'Dear, Rudolph'. It seems Santa has been skipping my address for the past years. I have no idea why...I've been nice...yup...I've been the nicest of 'em all. So this year I wrote Rudolph a letter instead, to see if he can direct the sleigh my way...lol... And the letter goes: "Dear, Rudolph..."

Anyways, enough craziness...this is it....
With two accent fingers total!


On the ring fingers I used 'Brown' from Jordana, Honestly, I think I should have gone for a lighter shade of brown, you barely see the nose. On the middle finger I used 'Gold Sparkle' from LA Colors. And the remaining nails are in 'Red Sparkle' from Milani. Since it's Christmas and the environment is festive, I thought about using a lot of glittery shades for this look. Thou I was already worried sick about taking all the glitter off. Those of you co- nail-polish-lovers know what a pain it can be to take off glittery polish...

Once the accent nails were totally dry I added the eyes and nose of Rudolph on the ring finger and on the middle finger I added a little ornamental piece...especially because I missed some green in the whole art.


Let everything dry thoroughly and add your favorite topcoat. And show off some glittery Rudolph nails this Christmas time...


Hope you enjoyed it once more.
Merry Christmas, you Dazzler....lol

X's n' O's

Dazzled,

Sy

Tuesday, 18 December 2012

Nails: "Snow, man!!"

Christmas is just around the corner. The season of joy, peace, sharing, loving...and SNOW (in certain continents).

Here on Curacao it never snows...and it probably never will, unless nature goes really 'kaboozles'. So I decided to do a snowy Christmas nail art...just for fun. And I called it "Snow, man!" just to portrait the irony of having "snow" in a particularly warm weather Island in the Caribbean.


I first started with two coats of 'Sassy Sparkle' from LA Colors (Color Craze) on both my ring fingers and 'Ciao Bella' from Sinful Colors on all remaining fingers. Let them dry thoroughly as this is going to be the background color for the nail art and if it's not dry you'll end up with messy nails.

Once it's dry I added two circles on my index fingers using a dotting tool. A larger circle as the snowman's belly and a smaller one for the head. In between the circles I left a small open space for mr. snowman's shawl.
On the remaining fingers I added a snowflake (Conad stamp nr m59) and three dots with the dotting tool.

When mr. snowman's body was dry I drew a red shawl using a fine brush in 'Hot Red' from Jordana and added a green accent with 'Dark Green' from Nabi. With the same brush a painted what would be the nose of mr. snowman using 'Perfect Sunset' from LA Colors (Color Craze).
Then with the dotting tool and 'Black' from Jordana, I added eyes and a set of buttons for the snowman...

Ready!


Wait until it's dry...add your favorite topcoat and you're ready to rock these totally COOL nails for Christmas.


You can try this with an elf instead, with mr. or mrs Claus, a Christmas tree or Gingerbread man... The whole idea is to have fun!

Here's wishing you the most colorful, creative and dazzling Holiday season ever...

X's and O's

Dazzled,

Sy

Monday, 19 November 2012

Pieces of Pastel

Another make-up look it is...

Honestly, I'm getting tired of the wait myself. So I might do another nail look shortly...


But in the mean time, this is it...
'Pieces of Pastel' a look I wore yesterday and personally loved it!

On the eyelid I applied pastel pink all over and white from the crease to the brow bone. Then I added light blue under the eyes, but not all the way to the inner corner.
In the inner corner I applied light green instead.
And then I added dark gray to the outer corner of the eye to accentuate the look, blend them...and ready steady.


 And since I mentioned my hair in the previous post...
In this post I simply parted a section in the front and tucked it back with a few hair pins.
The rest of my hair is held with a banana clip. As simple as that...


Well...that was it for today, lovebugs...
Hope you liked!

X's n' O's

Dazzled,

Sy.


Wednesday, 10 October 2012

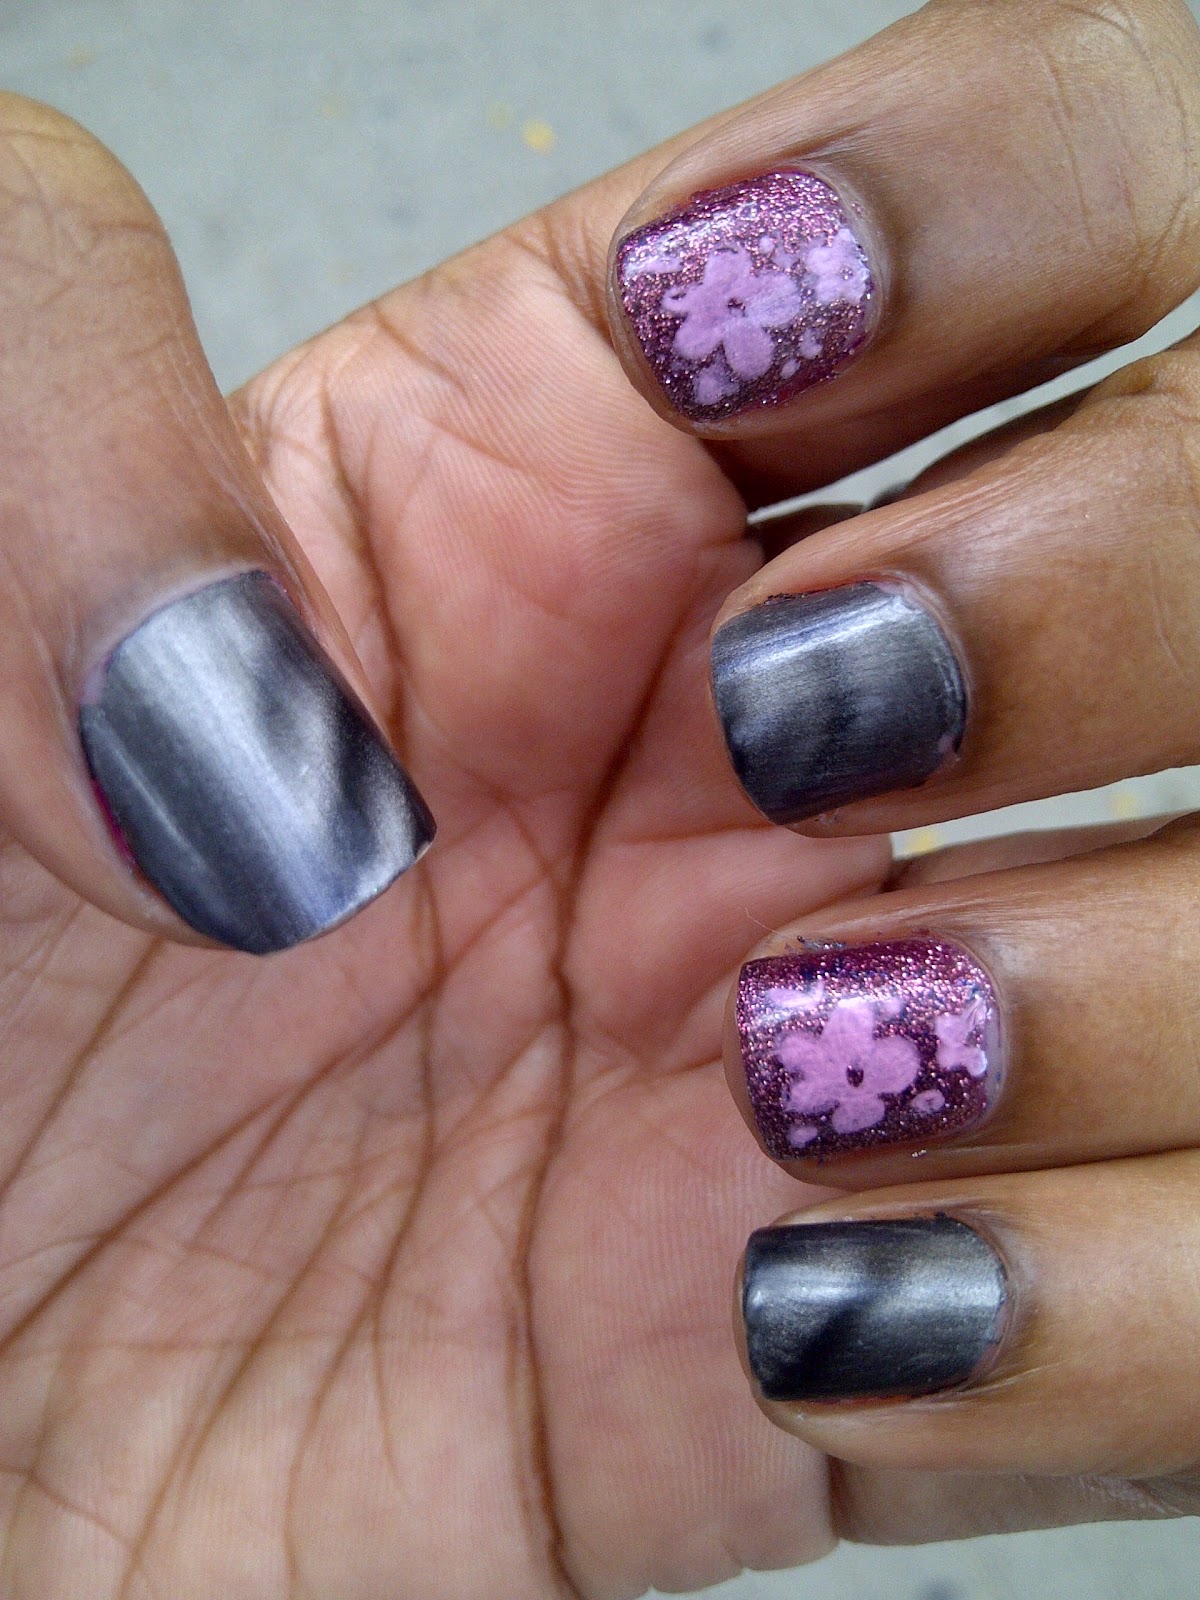
'Though Princess'

Miraculously I'm keeping up with the posts...

and even if I say it myself...I think I need an award for this...the keeping up...

Today we have 'Though Princess'...love the name and both the polishes I tried this time


Used the magnetic gray named '' and the Sun-changing gray glitters called ''. That's what brought me to the name exactly...
When I'm inside it's all gray...and it looks tough. The gray gives the impression of steel...metal and such. Especially with the magnetic effect...
But as soon as I go in the sun the glittery nails turn deep pink....just lovely. As though the princess behind all the heavy metal is peeking outside...


And to top the girly edge, I added some white flowery stamps on the sun-changing nails...
Et Voila...
I love these...really...


Can't wait to try out all the other ones.

X's n' O's

Dazzled


Sy

Sunday, 16 September 2012

Miami Express

By the time you receive this post, I would be on my way to Miami.


AAAAAAAARRRGGHHHH!!!! THAT FELT SO GOOD TO SAY!!!

Especially to show the excitement of this trip I did a distinguished Miami nail design called Miami Express.


I used an AVALANCHE of colors to achieve this look...

List of used colors

Pinky and the Brain (Catrice)
White (Jordana)
Bright Blue ( Jordana)
Rich Green (Jordana)
Beavis and Mudhead (Catrice)
Seashell (L.A. Colors)
Glorious Aquarius (Essence Nail art)
Express in Yellow (Jordana)
Brown (Jordana)
Voodoo (L.A. Colors)
Nail artist Fine art pen  (Kiss in black and pink)
Light blue permanent marker :)

Figured out there was so much going on on them nails??

The beach scene wasn't as complicated as it looks. With a very small brush you would achieve it in no time. My true headache was the plane though...I still think it looks kinda like a disabled mosquito... But I gave up around midnight hahaha...

Well...this is how the Miami Express rolls...
Vacation starts HERE!
LOL

Anyways...I have some vacationing to do...
As promised I've scheduled some posts so you won't stay empty-handed while I'm out there enjoying hahahahaha

See you very soon lovebugs,

X's n' O's

Dazzled and excited,

Sy

Thursday, 6 September 2012

Swatch: After Eight (Catrice)

I discovered I had several polishes in my stash that had never been used yet...not once.

As I reached home last night I was physically and mentally on autopilot...but my nails were looking HORENDOUS!
Totally chipped, not so vivid anymore and some broke (I need a good hardener).
Some of you might just not understand, but I experience painting my nails as a moment of relaxation. So as I stepped out of the shower I laid face-down on my bed and decided upon a simple swatch.

After Eight is a deep dark mossy green color with super tiny sparklish particles. Two coats, and you're ready to go!
I guess after using Catrice several times already it is needles for me to say that I'm madly in love with the flat brush. Really, that thing is GENIUS...
The color dried relatively quick...so as I started dosing off it was as good as completely dry.

It seems to be the perfect color to use on army themed nails. Camouflage maybe?

Well here's the swatch...


Any other ideas of nail art where the 'After Eight'could be used beside on camouflage nail art?

Well, hope you liked it.

Monday, 3 September 2012

'Feasting in Sri-Lanka'

And it's time for a new nail art....yes babyyyy!!!!

This is the promised NOTW (Nail Of The Week)...even thou I think it's not going to make it until Saturday...

It's called 'Feasting in Sri-Lanka". Simply because it made me think of the beautiful Sari the women wear to the festivities in the book I'm actually reading. The story is built in Sri-Lanka and oftentimes the writer describes the Sari the women wore for different occasions...in details and color....

Here...travel to Sri-Lanka with me...


Used colors; Purple Punch (Jordana), Limestone (Sally Hansen) and Chestnut (Jordana)...ofcoursewith the white dots in White (Jordana).
The two accent nails were water marbles and when totally dry I accentuated with the white dots for simple embellishment.I love how it turned out to be...REALLY do.

My opinion of the Limestone so far...It's not as creamy and opaque as it looked in the bottle. If you apply it too slow it might leave streaks behind on your nail. The good thing? It dried super quick...

I normally don't do this...But on Sunday I matched my eye make-up with my nails...just the colors. And no, I didn't use the Limeade(L.A.Colors)...this is just eye shadow...


YUP...green on the upper lid, purple right under the eyes and a dash of gold in the corners of the eyes...
Pretty much extravagant...I know.
First I thought I'd try to switch the green and the purple(after the make up was already done)...but hey, I'm not a morning person, I was late!!!

Nevertheless I'm pretty cool with the outcome.

I'm fighting between sleeping and reading on..lemme go check if I can read another chapter before mi eyes win this battle completely.

Hoping you enjoyed the post!

X's n' O's.

Dazzled,

Sy

Saturday, 1 September 2012

Caramel Covered Bananas and hauling

As promised in my last post, there was another make-up look; the one I wore last Sunday. This one's called 'Caramel Covered Bananas'.
I wore a dress that had beige, blue and black as the predominant colors. But in between all these deep colors, there where dashes of banana yellow, honey and purple. So I opted for yellow and bronze eyes to accentuate those colors in the dress.
And this is how it turned out to be...


Right from the inner corner until the half of the eyelid was made a light banana yellow tone and the outer half of the eye and the bone where given a bronzey tone.
To intensify the look I tight lined the upper lid and painted a very narrow line with theliquid eyeliner on half the eyelid as close to the lash-line as possible.

Status? Overall... pretty satisfied....

By the way.... I've also been HAULINGGGG!!!
It is official...I'm pretty much addicted I guess. Last Thursday I had to take the mom to the supermarket after work. It is normally the hour I use to read and stuff...since I usually just sit and wait in the car as she takrs her time to grocery shop..
This time I had to buy soap and hair gel thou...
"Soap and gel, soap and gel, soap and gel..." I repeated as I entered the cosmetic department of the supermarket. Everything went well...until I stood in the row waiting to pay and I saw them.....nail polish to drop death for... And I just HAD to have 'em...( especially the blue one)

Sally Hansen Hard as Nails in Limestone, Teal Steel and Nail'd it!
As incredible as it might sound, these are my very first Sally Hansen polishes in the actual stash. I have used the Sally Hansen top coats before, but not the colors...
 So, as soon as I try these on I'll let you know.

Besides nail polish, I also bought the jumbo eye pencil from L.A. Colors in Limeade...
This is the color it says to be...(picture from the official website of L.A. Color cosmetics)
I might try it on later on when I head to brunch with my girls...depending on what the make-up turn out to be.
All by all, I'm super happy with my newbies....

Soon to be posted...my new NOTW (Nail of the week) and a random product review. So subscribe quickly, that you may be the first to be notified when I post.

As for now, I will have to call it a night...

X's n' O's

dazzled,

Sy

Tuesday, 28 August 2012

The Matryoshka

As promised, my nails are done!
This one took me quite some hours and effort. And even some moments of wiping the nails completely clean and starting back from scratch.
After much struggling and fighting I ended up with the following look in the middle of the night...

It does need improvement; a lot of improvement. But considering the effort and precision it takes to achieve even this little much, I'm cool with the outcome for now. Not sattisfied... just cool.

It's called 'The Matryoshka' and it was inspired by a gift magnet I received in 2009 from a very dear friend of mine. A very simple gift which, to me, has a story behind it. I really value it more than I could tell.
Simply looking around in my room for inspiration my eyes fell on the magnet on the white-board and with a smile I thought "hmmm, why not?"

So here you go...'The (yet amateur) Matryoshka'.


Colors used to achieve this design: Red Hot (Jordana) as the base color on all the nails. The dots on the middle fingers were done with Creamy Fucshia (Jordana), Mellow Yellow (Jordana) and Good Luck Charm (Jordana).
First I tried to paint the face directly on the fingers...but it was too much of a manouvre. So I decided to paint them on tape, let them dry and stick them to the nails and secure them with a topcoat.
I think I didn't let them dry that well thou, since the topcoat smudged the design a bit.
Colors used for the face were Sea Shells (L.A. Colors) for the face, Brown (Jordana) for the hair, Creamy Fucshia (Jordana) for the cheeks, Red Hot (Jordana) on the lips, a little Good Luck Charm (Jordana) in the eyes and originally the nose and the rest of the eye were painted with a Black (Kiss) nail art pen. Thou that faded almost completely...

Again the whole designing was done with tootpicks and the ballpoint by the way. In two weeks I'm goint to be in Miami and I'll check on some stamping sets and dotting tools. As for now, I can roll with my creativity and some simple everyday stuff to achieve the wanted designs...

Well, this was it. Any changes, any new nails, any updates...you'll be one of the firsts to know.

As for now, I'm off.

X's n' O's

Dazzled,

Sy

Wednesday, 15 August 2012

'Dear Mermaid

I walked around a couple of days without having painted mý nails....and I felt NAKED!

Last night I decided to try on another look with my new polishes. This one's called 'Dear Mermaid' and it looks like this...


I'm seriously in love with my nails at the moment...seriously.
Here, I decided to include a picture of everything I used to achieve this look (minus the base and topcoat).

Base color is the Acid DC from Catrice. And on the accent nails I decided to use Cosmic from Jordana instead of the Glorious Aquarius from Essence. Difference is, the Cosmic has green glitters, which complimented the Acid DC in this case to my opinion.
The nail polish remover and the cotton swab where used for cleaning up possible mistakes around the nails of course hihi.
The stamps were made with Birds Flying High from Catrice Coolibri (Limited Edition), the BIC pen (yes just a regular ballpoint) and the wooden stick you see here. I actually filled the insides of the bigger circles with the Kiss Nail Artist pen, but it somehow faded before getting topcoated. Nevertheless...I'm happy...

...and totally dazzled!

See you in my next post darlings!

X's n' O's

Sy

 
Powered by Blogger